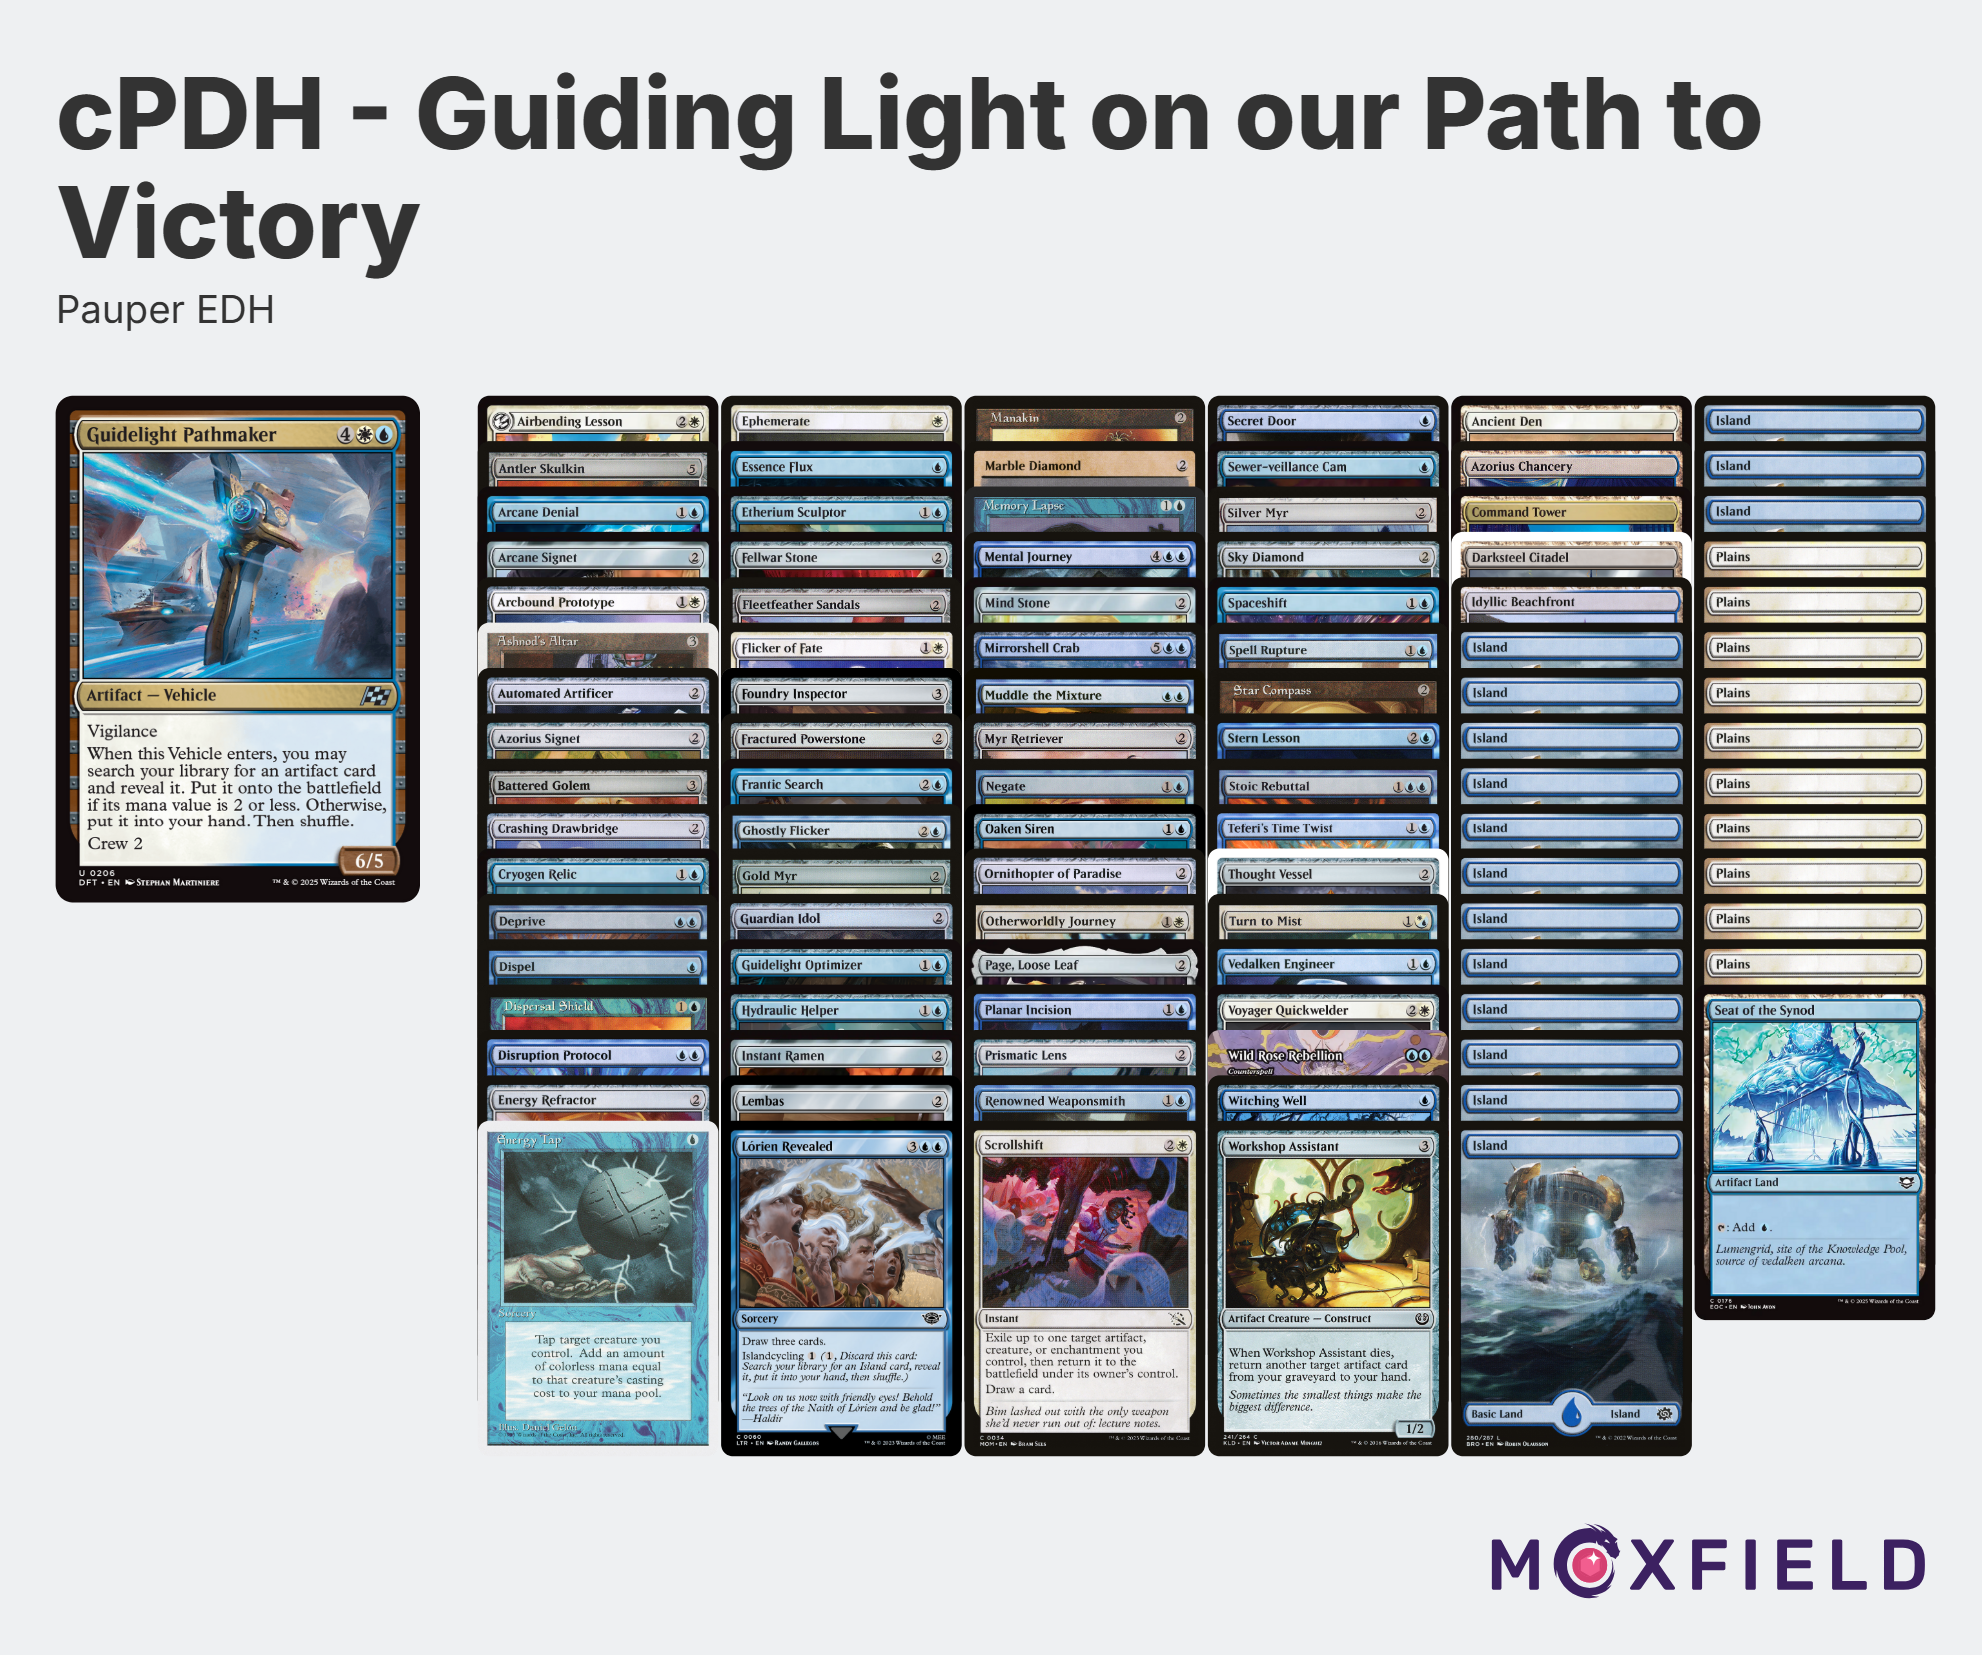
As soon as the announcement was made that vehicles and spacecraft could be commanders, I immediately went on the hunt for the best one. I found a vehicle that stands tall above all the other non-creature artifacts that have been made available, and it’s the vehicle I want to talk to you about today: [[Guidelight Pathmaker]].
[[Guidelight Pathmaker]] is from 2025’s Aetherdrift set. It’s a six-mana {4}{W}{U} Azorius vehicle that has vigilance and Crew 2, allowing it to become a 6/5. Most importantly, it reads:
“When this Vehicle enters, you may search your library for an artifact card and reveal it. Put it onto the battlefield if its mana value is 2 or less. Otherwise, put it into your hand. If you search your library this way, shuffle.”
At first glance, two things drew me to this commander. First, its colors. There are only 11 vehicles (no spacecraft) that offer access to multiple colors — almost all of them fresh cards from the Aetherdrift set, with one exception in [[Prodigy’s Prototype]] from Kamigawa: Neon Dynasty. Having access to multiple colors is a big deal in PDH, as it allows you to reach a broader range of cards.
The second thing that gave me cartoon wowza eyes is the power of this commander’s tutor ability. [[Summoner Sphinx]] already sees some success in the format, and that tutor ability is limited to artifact creatures only. Guidelight Pathmaker can find any artifact — and if it’s 2 CMC or less, it goes directly to the battlefield.
I worked vigilantly to find a way to crack this deck and make it cPDH viable. At first I fell into the same trap many other brewers fall into, trying to find combos that were partially artifacts and partially non-artifacts. I couldn’t bring it together to make it cohesive — until I realized the final piece of the puzzle I’d been missing the entire time. The piece that allowed me to fully utilize the power of this commander’s text box: if crewed, it becomes a white creature. Hello, [[Antler Skulkin]].
The Win Condition
Winning requires a lot of game actions, so let’s start at the beginning — this way you know what you’re working toward.
To win the game, you need your commander, [[Ashnod’s Altar]], and an untapped [[Antler Skulkin]] on the battlefield, plus {5} available mana. Additional mana and a few counterspells wouldn’t go amiss, but with just these three cards and 5 mana, you can win. Do you see it? Let’s break it down step by step:
- Tap [[Antler Skulkin]] to crew [[Guidelight Pathmaker]].
- Pay {2} to use Antler Skulkin’s ability to give your commander persist.
- Sacrifice your commander to [[Ashnod’s Altar]], getting the persist trigger and returning up to {5} mana to your mana pool.
- On re-entry, use the artifact tutor trigger to find [[Arcbound Prototype]] and bring it directly to the battlefield.
- Crew your commander with [[Arcbound Prototype]].
- Give [[Arcbound Prototype]] persist using [[Antler Skulkin]]’s ability.
- Sacrifice Arcbound Prototype, generating both a modular trigger and a persist trigger. The modular trigger puts its +1/+1 counters on [[Guidelight Pathmaker]], removing its -1/-1 counter as a consequence. Arcbound Prototype returns to the battlefield with a single +1/+1 counter.
- Give your commander persist, then sacrifice it to [[Ashnod’s Altar]]. Use the tutor trigger to find [[Battered Golem]].
- Cast [[Battered Golem]].
With all five cards on the battlefield, you can now trigger your commander’s artifact tutor ability an infinite number of times. Crew it with [[Battered Golem]] (which untaps each time another artifact you control enters); provide persist with [[Antler Skulkin]]; provide the sacrifice outlet and the mana to pay for Antler Skulkin’s ability with [[Ashnod’s Altar]]; and use [[Arcbound Prototype]] to continually remove the -1/-1 counters from [[Guidelight Pathmaker]] after its persist triggers.
You can now pull every artifact in your deck straight onto the battlefield or into your hand. Along the way, you’ll draw several cards and generate several mana sources.
After pulling every artifact out of your deck, you’ll have [[Myr Retriever]], [[Etherium Sculptor]], [[Energy Refractor]], [[Secret Door]], and [[Ashnod’s Altar]] on the battlefield, with [[Workshop Assistant]] in hand. Use the last two mana from the persist loop to cast Workshop Assistant, sacrifice Myr Retriever to get two mana back, and begin looping these two graveyard fetchers to net one mana per loop.
Once you have infinite mana, filter it through Energy Refractor to generate as much blue mana as you need, then begin activating [[Secret Door]] until you ping your opponents out of the game. We’re almost always using the Lost Mine of Phandelver — it pings each opponent as you venture through it. One important note: your number of pings is limited to how many cards remain in your deck, since the final room of the Mine requires you to draw a card. In the unlikely scenario your opponents are at high life and you’re running low on cards, consider routing through the Tomb of Annihilation instead.
This is perhaps the most convoluted path to victory I’ve ever concocted — but it all starts from just three cards in play and 5 available mana.
Mana Base
Mana sources make up 60% of this deck: 32 lands, two land fetchers, and 26 mana rocks and dorks. Our commander costs 6 to cast and we can’t win without it, so dawdling is not an option. Our primary combo lines can be quite expensive too, so having extra mana in reserve is always welcome. We also want redundancy, since mana dorks can be removed — being able to slot in a replacement is invaluable.
The goal is to cast our commander on or before turn 4. To hit that, we need a good mix of land and non-land mana sources — ideally 3–4 lands and 2–3 non-land mana sources in our opening hand.
Counter Magic
These cards are here first and foremost to protect ourselves and our combo lines. They have the flexibility to act as preventative interaction against our opponents’ progress, but unless someone else is actively trying to win, I believe the correct line is to hold them and protect ourselves later.
Flicker Spells
Initially these spells were intended purely as instant-speed tutors — by flickering our commander, we trigger its search ability on demand. Instant-speed tutors in PDH — how strong! Five of these flickers were specifically selected for their ability to target our commander as an artifact, without requiring it to be crewed first.
Through play, I’ve found these spells have incredible flexibility. They serve three distinct functions:
Tutors — flickering our commander to find more of what we need, even at instant speed, is exceptionally strong. Five of our flicker spells can target the commander as an artifact without it needing to be crewed first.
Protection — when our permanents are targeted, we can get them out of harm’s way. Spells with a delayed return can even protect our creatures through edicts.
Removal — five of these flicker spells don’t specify that the target must be under our control. That means we can use them to disrupt opponents, particularly during their combo turns, to prevent them from going off.
Package Variations
I usually include some build variations for readers who want to take a deck in a different direction — but not today. I’ve considered other builds, and I like this one best. I haven’t yet found a deck that demonstrates a clearer or more admirable game plan for this commander.
I considered Voltron — it’s quite nice being able to push in damage with vigilance on such a large body — but enchantments and equipment fall off when the commander reverts to a non-creature artifact. There are other combo lines you could integrate, but having a fully-artifact combo means all the pieces are accessible through the command zone. A midrange variant, fetching your favourite artifact creatures, is possible — but that game plan is departing cPDH.
Playing Against This Deck
How you play against this deck depends on whether you’re ahead or behind.
If you’re ahead and feel you’re close to winning, kneecap the deck by targeting its three main components: the commander, [[Ashnod’s Altar]], and [[Antler Skulkin]].
If you’re behind and want to slow the deck without dismantling it entirely, the best tool is instant-speed graveyard hate. Importantly, this also allows the Guidelight player to still find interaction and work as an ally on the board by taking meaningful game actions rather than being relegated to the sidelines. Exiling one of the retriever creatures while it’s in the graveyard prevents the combo from completing, leaving the Guidelight Pathmaker player with access to counterspells and interaction — but without their key pieces, forcing them into a long, arduous Voltron beatdown. It slows them significantly, but doesn’t shut them out of the game entirely.
I’ve been asked what the correct way to apply pressure to this deck is. My answer: Sometimes the truck spins its wheels and doesn’t have the means to follow through on its explosive potential. Keep up instant-speed interaction — counterspells, removal, and graveyard hate are all effective here — to disrupt the combo turns, but otherwise the Guidelight Pathmaker game plan tends to be rather passive until it isn’t. Try to focus on winning the game before Guidelight can be a problem.
Conclusion
I’ve had so much fun showing up to tables and proclaiming that I’m going to play the game with my truck! The deck was a joy to build — discovering the combo line that lets you empty your entire deck onto the battlefield felt genuinely satisfying. I’m proud of this truck. I’ve been working on it, getting under the bonnet and fixing up the engine so it can rev loud and run proud.
I hope you check it out, and if you feel inspired to take it for a spin, you can use the link below to purchase the deck straight from Manapool. Happy driving!
Have your own deck tech? We'd love to feature it on CPDH.guide!
Submit Your Deck Tech →